
ABOUT ME
A little more information about me
// SKILLS
- C# SQL Server Python ASP.NET MVC API WebService GraphQL NodeJS VB.NET VBA HTML CSS JS (ES6) AngularJS SvelteJS Unit-Test UX-UI MS-Test Automation Selenium Sonarqube Git TFS Docker Linux RabbitMQ
// TIMELINE
2021
Azure Fundamentals * In Progress
2020-*
2019
Microsoft C# Programming Specialist
2018-2020
2017
Microsoft Certified Solutions Associate as SQL Database Development
2016
Microsoft Certified Professional
2013
Master's degree in Information Technologies
2002-2018
Software Architect,
Software Developer,
SysAdmin
2002
Computer Science, Telematics Engineering
RECENT POST
Recent entries from the blog, code snnipets, ideas, and random toughtsEverytime I run docker ps to list my containers, I find hard to understand where does the list start and where it ends:
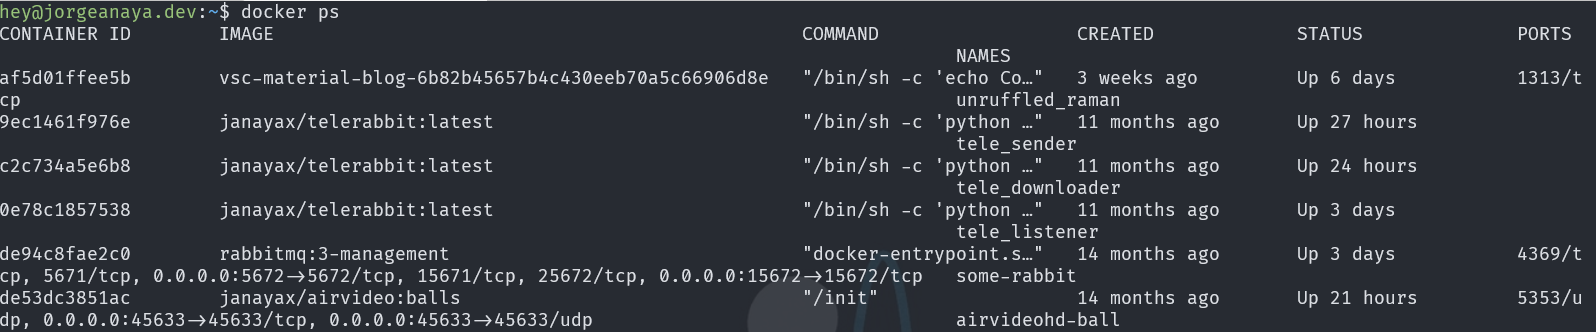

What the! ... the port, which one? ... I almost feel like I'm seeing the matrix
I have to say, after some time your eyes get used to and begin to do weird movements but at the end you begin to understand the output, of course it shouldn't be this way, so I found there are server ways to improve the command output, let's take a look.
Use —format
Use the option --format, using this we can choose from a list of fields (see the table below) and display them in a ordered layout using the following syntax table {{.FieldName}}\t. The format option uses Go templates underneath, hey that looks familiar to me1.
table print the field name and \t adds space between columns.
Example using --format
 docker ps --format 'table {{.Names}}\t
                           {{.Status}} : {{.RunningFor}}\t
                           {{.ID}}\t
                           {{.Image}}'
And we got this :

Definitely a better command output so much easy to read and understand
Taking advantage of Go Templates
We can get creative with Go Templates and lets query our containers to get network information including ports (a clean output would be to show every port in his own line but only if ports are used):
Network information
docker ps --format 'table {{.Names}}
                          \t{{.Status}}
                          \t{{.Networks}}
                          \n{{.ID}}
                          {{if .Ports}}
                            {{with $p := split .Ports ", "}}
                              {{range $p}}\t\t{{println .}}{{end}}
                            {{end}}
                          {{else}}
                            \t\t{{println "No Ports"}}
                          {{end}}'

Here you have, we can get all network data in a more readable way
All containers docker ps –a
Using the option ps -a will list all containers in any state. So it would be nice to add the disk space, a summary of the network use and the image from where the container derives.
All containers list
docker ps -a -q --format 'table {{.Names}}\t
                                {{.Status}}\t
                                {{.Size}}\n
                                {{.ID}}\t
                                {{.Image}}
                                {{if .Ports}}
                                  {{with $p := split .Ports ", "}}\t
                                    {{len $p}} port(s) on {{end}}{{- .Networks}}
                                  {{else}}\tNo Ports on {{ .Networks }}
                                {{end}}\n'

Look at this! An easier way to spot information about all containers.
Create a function to reuse the commands
Finally we can create a function to reuse these commands (if you are using WSL or Linux) inside our .bash_aliases file
Create a bash function that allows parameters
# Docker PS Prettify Function
function dock() {
  if [[ "$@" == "ps" ]]; then
    command docker ps --format 'table {{.Names}}\t{{.Status}} : {{.RunningFor}}\t{{.ID}}\t{{.Image}}'
  elif [[ "$@" == "psa" ]]; then
    # docker ps -a includes all containers
    command docker ps -a --format 'table {{.Names}}\t{{.Status}}\t{{.Size}}\n{{.ID}}\t{{.Image}}{{if .Ports}}{{with $p := split .Ports ", "}}\t{{len $p}} port(s) on {{end}}{{- .Networks}}{{else}}\tNo Ports on {{ .Networks }}{{end}}\n'
  elif [[ "$@" == "psnet" ]]; then
    # docker ps with network information
    command docker ps -a --format 'table {{.Names}}\t{{.Status}}\t{{.Networks}}\n{{.ID}}{{if .Ports}}{{with $p := split .Ports ", "}}{{range $p}}\t\t{{println .}}{{end}}{{end}}{{else}}\t\t{{println "No Ports"}}{{end}}'
  else
    command docker "$@"
  fi
}
To use the function just type:
- dock ps
- List running containers and its image name
- dock psa
- List all containers no matter what state and includes disk space and network information
- dock psnet
- List running containers with detailed network information
Available fields in docker
- .ID
- Container ID
- .Image
- Image ID
- .Command
- Quoted command
- .CreatedAt
- Time when the container was created.
- .RunningFor
- Elapsed time since the container was started.
- .Ports
- Exposed ports.
- .Status
- Container status.
- .Size
- Container disk size.
- .Names
- Container names.
- .Labels
- All labels assigned to the container.
- .Label
- Value of a specific label for this container. For example ‘{{.Label “com.docker.swarm.cpu”}}’
- .Mounts
- Names of the volumes mounted in this container.
- .Networks
- Names of the networks attached to this container.
The Issue
I was working on my Linux server, and I had to restart it. The docker instance was empty when the server came back, and it didn't show any container. I was in shock, and I thought I had lost my images and containers. After reviewing the system's health couldn't found a root cause, so I did a second restart 😅 and that's it the containers were back. Great! But when I tried to start my containers …

ERROR: network xxxx is ambiguous (2 matches found based on name)
The Whys
I found that docker allows repeating network names 👻; my hunch here is that when the system restarted something (maybe my container disk didn't mount properly), docker recreated the network configuration. As you can see in the following table, it duplicated every network and driver
docker network list
$ docker network ls
NETWORK ID NAME DRIVER SCOPE
27b6c27fdc2b bridge bridge local
33f2a0c04878 bridge bridge local
c4247d693521 host host local
9b95be563bf7 host host local
590102262bb5 none null local
25e1bf9dc86 none null local
So the solution appeared to be, just to delete one of the duplicate networks by his ID.
I tried to execute the following command docker network rm [ID]

Error : bridge is a pre-defined network and cannot be removed
What the … this was more tricky than what I initially thought, at some forum, I found some arbitrary advice:
- The docker service must be stopped
- There shouldn't be a container using the network
- And another workaround is not to have containers (delete them)
If you need to see which containers are using which network use:
Inspect network ID of a container
# Note that in this scenario since bridge is repeated you'll need to do it by Id:
docker network inspect [id || name]

"Internal": false,
{ "Network": "" },
"ConfigOnly": false,
"Containers": {},
So, at this point option one and two didn't work and I couldn't afford to delete all my containers which there were already configured with his own volumes and startup scripts.
Workaround and Solution
-
Create a new network. Use the parameter
-dto specify the driverdocker network create -d bridge [new-network-name] -
Disconnect the container(s) from the ambiguous network
docker network disconnect bridge [container-name] -
Connect the container(s) to the new network
docker network connect [new-network-name] [container-name] -
Optional. Purge our network and get rid off of the unused networks
docker network rm $(docker network ls -q)
And that's all, now we should be able to start our containers.

docker start my-happy-container
The following code allow us to understand the way we can built a simple react app
Read the comments in the code
<!DOCTYPE html>
<html lang="en">

<head>
  <meta charset="UTF-8" />
  <meta name="viewport" content="width=device-width, initial-scale=1.0" />
  <meta http-equiv="X-UA-Compatible" content="ie=edge" />
  <title>React JS Search Results</title>
  <!-- Add React and Babel References -->
  <script src="https://unpkg.com/react@16/umd/react.development.js"></script>
  <script src="https://unpkg.com/react-dom@16/umd/react-dom.development.js"></script>
  <script src="https://unpkg.com/babel-standalone@6.26.0/babel.js"></script>
</head>

<body>
  <section>
    <!-- Every React app must have what’s known as an entry point.
    The entry point is an HTML element where we insert our React application into the page. -->
    <div id="root">
    </div>

    <!-- Our Script must have type="text/babel" for Babel to work-->
    <script type="text/babel"> //React code will go here
      // Babel converts this code that looks like HTML into valid JavaScript (JSX: JavaScript XML)
      // The functions in react must be Capitalize to differentiate from normal javascript functions
      // React Functions became Components
      // The Component must return JSX code between parenthesis function ComponentName() { return ( ...JSX Code ... ) }
      // Every React Component must return either JSX elements or other React components.

      /* PROPS (Passing data to the components)
        We can pass data to the function components using attributes and it is passed to the Link function as an argument
        <Link attributeName="value" />

        React collects and organizes the data passed to a given component as a single object.
        The name for data passed to a component, such as title, is props.
        All prop values exist within the function component itself on a props object.
      */

      /* SEPARATE DATA FROM UI
          Make and array of objects and pass down the link components through props.
          Since this is a common pattern in React, it has its own method .map() that works with JSX
          (don't confuse with JS array.map() it's similar but Reacts works only for JXS)
      */

      const linkData = [
        {
          title: "React - A JavaScript Library for Building User Interfaces",
          url: "https://reactjs.org",
          shortUrl: "reactjs.org",
          excerpt: "React makes it painless to create interactive UIs."
        },
        {
          title: "Jorge Anaya's Blog",
          url: "https://www.jorgeanaya.dev",
          shortUrl: "jorgeanaya.dev",
          excerpt: "Personal insights about coding and life"
        },
        {
          title: "Google",
          url: "https://www.google.com",
          shortUrl: "google.com",
          excerpt: "When everything fails then Google is your friend, GoogleIt!"
        }
      ]

      function Link(props) {
        // We use {} curly braces to insert or interpolate dynamic values wherever we need.
        return (
          <div>
            <a href="{props.url}">{props.title}</a>
            <div>
              <h3>{props.shortUrl}</h3>
            </div>
            <div> {props.excerpt}
            </div>
          </div>
        )
      }
      // Since React components can return other React components, we can make an App Component
      // The entire JSX expression is surrounded by curly braces
      // JSX allows us to insert any valid JavaScript expression between curly braces.
      function App() {
        return (
          <section>
            {linkData.map(function (link) {
              return (
                <Link
                  key={link.url} // Each child in a list should have a unique "key" prop
                  title={link.title}
                  url={link.url}
                  shortUrl={link.shortUrl}
                  excerpt={link.excerpt} />
              ); // return end, function, map() & expression end */
            })}
          </section>
        )
      }
      ReactDOM.render(<App />, document.getElementById('root'))
    </script>

</body>

</html>To concatenate some videos using ffmpeg we need to provide a text file with the word file followed by the path to the media:
VideoList.txt
# We can use absolute or relative paths

file '/path/to/video1.mp4'
file '/path/to/video2.mp4'
file '/path/to/video3.mp4'
Run
# If you use an absolute path to the file we need to add the parameter -safe 0
ffmpeg -f concat -safe 0 -i videolist.txt -c copy output.mp4
The following scripts will allow us to automate the creation of the text file
# Windows
(for %i in (\*.mp4) do @echo file '%i') > videolist.txt
ffmpeg -f concat -i videolist.txt -c copy output.mp4

# Bash
for f in ./\*.mp4; do echo "file '\$f'" >> videolist.txt; done
ffmpeg -f concat -i videolist.txt -c copy output.mp4

# Zsh - Using Zsh we can run the command in one single line
ffmpeg -f concat -safe 0 -i <(for f in ./\*.mp4; do echo "file '$PWD/$f'"; done) -c copy output.mp4
Sometimes would be useful to repeat the same video n times, use the following scripts
Repeat same video
# Windows ... in (start,step,end)
(for /l %i in (1,1,10) do @echo file './videoloop.mp4') > mylist.txt
ffmpeg -f concat -i list.txt -c copy output.mp4

# Bash
for i in {1..4}; do printf "file '%s'\n" input.mp4 >> list.txt; done
ffmpeg -f concat -i list.txt -c copy output.mp4
REFERENCES:
A basic task when you are scripting is to verify if a string is empty or not. We can do it using the following operators -n y -z
Check if empty
#!/bin/bash

VAR=''
if [[ -z $VAR ]]; then
echo "String is empty."
fi
Check if not empty
#!/bin/bash

VAR='Linuxize'
if [[ -n $VAR ]]; then
echo "String is not empty."
fi
REFERENCE: Linuxize
Here is a tip to connect to SQL Server Management Studio using different windows credentials than the current logon, very useful when using VPN and requires using another user from another domain.
The key is to create a shortcut and use the command runas with parameters /user and /netonly to which we point out the SSMS exe file at the end we add the nosplash option.
SSMS run as
C:\Windows\System32\runas.exe /user:domain\username /netonly "C:\Program Files (x86)\Microsoft SQL Server\140\Tools\Binn\ManagementStudio\Ssms.exe -nosplash"

When you launch the SSMS via this shortcut it will open a command prompt asking for your REMOTE password. Keep it in mind.
NOTE: The user name in the connection window will show the current local user, but it will use the user name that you previously define in the runas parameter.
Sometimes we need to undo our last commit but we don't want to lose the changes we've already made. There are several reasons, sometimes we made a commit prematurely or we forgot to add a file, etc.
WARNING: These commands assume we haven't sync/publish the changes to a remote origin.
git reset: What it actually does is that moves the actual branch to X commit,
so, using HEAD~1 or "HEAD^" (both are valid) we move the actual branch to the previous commit, example:
git reset
\$git reset HEAD~1
If we included --soft as parameter it will mark the files (actual changes) ready to commit
Using soft
\$git reset --soft HEAD~1
Ok then, as simple as that, but sometimes we require to clean up a little and reflect that on the commit message in that case use git commit --amend (Notice that this will open our configured editor to change the message), example:
Use amend
$git rm private.key
$git commit --amend

Use case, You committed your code twice but noticed there is an error in the author
Fix the author
$git reset HEAD~1
$git commit --amend --author="Jorge Anaya "
$git add .
$git commit -m "Fix bla bla bla"
The Emergency 🔔
Notification, there is an emergency, you need to connect to a remote desktop to run some transact SQL queries, you do it, press F5 and … 💥

An error occurred while executing batch. Error message is: There is not enough space on the disk....
C:\Users\...\AppData\Local\Temp so it can process the results of your query.

Your first reaction, of course, is to clean temp files, your recycle bin, old documents, maybe execute the cleanup wizard in windows but if you are lucky you'll get only a few megabytes
WinDirStat
Suddenly you remember this amazing app WinDirStat, so you install it and let it do its work. Thanks to this, you'll find two issues:
Clean Recycle Bin for Everybody
Issue 1. Your partners aren't careful with their recycle bins
Open your terminal as administrator and run :
Clean recycle bin
rd /s c:\$Recycle.Bin
If somebody complains you could tell: Don't blame me, it was in the recycle bin for a reason
Windows Installer Folder

Issue 2. Windows is messy with the cleanup of \Windows\Installer folder
In short, the issue is that when you uninstall an app, their update / installation package is not always deleted It is supposed that you shouldn't touch this folder because could lead to update or install issues, but as always is a trade off, you should proceed carefully.
So the fix is to find orphaned installation/update files that belong to apps that are not installed anymore in the system.
Manually run the next VBA Script that shows the files that we should KEEP in the system, everything that is not in the output file could be deleted
VBA Script
'' Identify which patches are registered on the system, and to which
'' products those patches are installed.
''
'' Copyright (C) Microsoft Corporation. All rights reserved.
''
'' THIS CODE AND INFORMATION IS PROVIDED "AS IS" WITHOUT WARRANTY OF ANY
'' KIND, EITHER EXPRESSED OR IMPLIED, INCLUDING BUT NOT LIMITED TO THE
'' IMPLIED WARRANTIES OF MERCHANTABILITY AND/OR FITNESS FOR A
'' PARTICULAR PURPOSE.

'Option Explicit

Dim msi : Set msi = CreateObject("WindowsInstaller.Installer")

'Output CSV header
WScript.Echo "The data format is ProductCode, PatchCode, PatchLocation"
Set objFSO = CreateObject("Scripting.FileSystemObject")
Set objFile = objFSO.CreateTextFile("output.txt", True)
objFile.WriteLine "ProductCode, PatchCode, PatchLocation"
objFile.WriteLine ""
' Enumerate all products
Dim products : Set products = msi.Products
Dim productCode

For Each productCode in products
' For each product, enumerate its applied patches
Dim patches : Set patches = msi.Patches(productCode)
Dim patchCode

    For Each patchCode in patches
    	' Get the local patch location
    	Dim location : location = msi.PatchInfo(patchCode, "LocalPackage")
        objFile.WriteLine productCode & ", " & patchCode & ", " & location

    Next

Next
WScript.Echo "Data written to output.txt, these are the registered objects and SHOULD be kept!"
Thanks to Raymond.cc for the article, you could explore the article to find other ways to clean up the windows installer folder.

Hopefully, with these two tips you could claim precious space for your computer
Recently, vscode add a new extension Remote Development that allow us to connect to a remote project via SSH, Containers or WSL.
I'm using it to connect to a local linux server using SSH.
-
Install the extension Remote Development
-
Configure SSH
To configure from Mac OS (~/rs_pub.id):
ssh-keygen -t rsa -b 4096 sh-copy-id jorgeanaya@host-fqdn-or-ip-goes-here -
Configure the access
SHIFT+CMD+P- 3.1 Remote SSH: Connect to Host
- 3.2 Configure SSH Hosts …
- 3.3 Select ~/.ssh/config
Host server-name
HostName 192.168.1.10
User jorgeanaya
Cmder is a powerful console emulator that has a lot of features and brings some of the joy of working in terminal from macos/linux to windows. I've been using it for a while and always forget how to configure in visual studio code, so, follow these two steps to configure as default terminal:
-
Create a bat file in your Cmder folder
vscode.bat
@echo off SET CurrentWorkingDirectory=%CD% SET CMDER_ROOT=C:\cmder CALL "%CMDER_ROOT%\vendor\init.bat" CD /D %CurrentWorkingDirectory% -
In VSCode open configurations and setup the next json values | Use
Ctrl + ,to open settings.jsonsettings.json
"terminal.integrated.shell.windows": "C:\\WINDOWS\\System32\\cmd.exe",
"terminal.integrated.shellArgs.windows": ["/K", "C:\\cmder\\vscode.bat"],
"terminal.integrated.fontFamily": "Fira Mono for Powerline", /_ Font is optional _/
KEEP READING IN THE BLOG SECTION
PROJECTS
Projects I've been working on, general news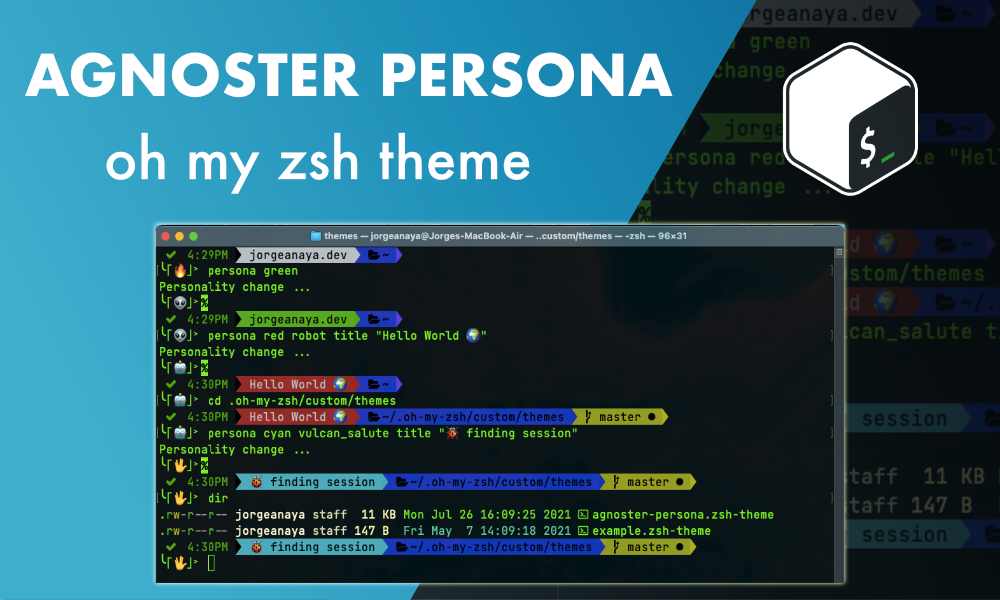
Agnoster Persona
A custom theme for oh my zsh
I worked in a custom theme for oh my zsh, I use the agnoster theme as base and added some elements to spice up the console.
The idea behind this modification is to add “personality” to command line, sometimes you're working with several tabs and this customization allows to quickly identify which one is the one you're looking for and have fun in the process.
- Two line command prompt means more space for title, current path, git status, pyvenv
- Includes last command status and time of execution
- Change context title and color
- Change emoji in command prompt
- Based on Agnoster so it includes git status, pyvenv, nodejs, aws
Please take a look at the Agnoster Persona repo at GitHub